Why Most PPM Schedules Fail Before They Start
Let’s be honest—most preventive maintenance (PPM) schedules fail because they’re either too generic or too complicated. You’ve seen the Excel sheets with 50 tabs, right? They’re a nightmare to update, and nobody uses them after the first month. On the flip side, a vague checklist like “Check HVAC” every three months doesn’t cut it either. That’s not maintenance planning; that’s wishful thinking.
The key to a good PPM schedule is balance. You need enough detail to catch problems before they escalate but not so much that your team spends more time updating spreadsheets than maintaining equipment.
Here’s how to create a PPM schedule template that actually works—and keeps your construction projects running smoothly.
Step 1: Start with the Critical Equipment
Not every asset needs to be in your PPM schedule. Focus on critical equipment that, if it fails, will cause major delays or cost overruns. For most construction projects, this includes:
- Earthmoving equipment (excavators, bulldozers)
- Cranes and lifting gear
- Concrete mixers and pumps
- HVAC systems for temporary on-site facilities
- Power generators
How to Identify Critical Equipment:
- Assess Downtime Impact: Rank your equipment by the potential impact of downtime. For instance, a crane out of service for two days can halt an entire project, while a faulty HVAC system might inconvenience workers but won't stop the build.
- Analyze Repair Costs: High-repair-cost machinery should receive greater preventive attention to avoid expensive breakdowns.
- Review Past Data: Look at historical maintenance logs for patterns in failures or high-use equipment.
Pro Tip: Use a simple scoring system to prioritize. For example, score each piece of equipment from 1 to 5 on downtime impact, repair cost, and frequency of use. Focus your PPM on assets with the highest combined scores.
Step 2: Build Task-Specific Checklists
A generic “inspect equipment” task won’t cut it. Break down each maintenance activity into specific steps that are actionable and measurable. Here’s an example:
| Equipment | Task | Frequency |
|---|---|---|
| Excavator | Inspect hydraulic hoses | Monthly |
| Check bucket teeth wear | Weekly | |
| Tower Crane | Lubricate slewing ring | Bi-weekly |
| Inspect limit switches | Monthly | |
| Generator | Change oil and filters | Every 100 hours |
Steps to Build Checklists:
- Follow Manufacturer Guidelines: Most equipment manuals include recommended maintenance intervals and tasks. Use these as a baseline.
- Incorporate Site-Specific Needs: Adjust tasks based on environmental factors like dust, extreme temperatures, or heavy usage.
- Use Actionable Language: Instead of “check hoses,” write “Inspect hoses for leaks, cracks, and wear.”
- Assign Responsibilities: Clearly state who is responsible for completing each task (e.g., site mechanic, operator, or third-party service).
Why Granularity Matters:
The more specific your tasks are, the easier they’ll be to execute. Ambiguous instructions lead to skipped steps or incomplete maintenance, which defeats the purpose of preventive planning.
Step 3: Align Maintenance with Procurement Lead Times
Here’s where most schedules fall apart: they don’t account for lead times on replacement parts. It’s no use discovering a failing generator filter if the replacement takes three weeks to arrive.
How to Align Maintenance and Procurement:
- Map Out Replacement Timelines: For each critical part, document its typical lifespan and lead time.
- Use Procurement Tools: Tools like EstimateNext can integrate procurement timelines into your PPM schedule. For instance, if a generator filter change is due in 30 days, the tool can flag when to place the order based on supplier lead times.
- Stock Critical Parts On-Site: For high-priority equipment, keep frequently replaced parts in stock to eliminate downtime.
- Communicate with Suppliers: Build relationships with suppliers to ensure faster delivery times or priority service.
What to Avoid: Don’t assume parts will always be available just because they’ve been stocked before. Always verify lead times before finalizing your schedule.
Step 4: Use a Gantt Chart for Clarity
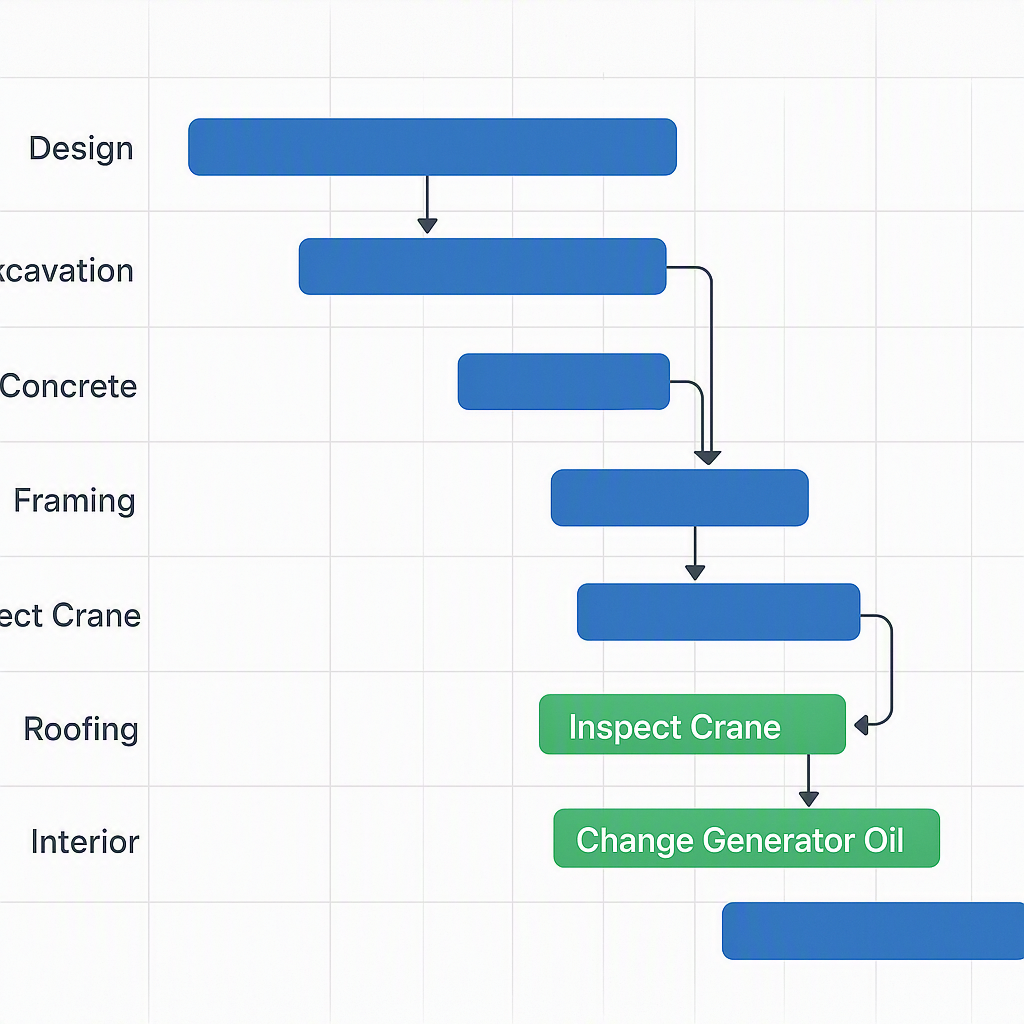
A visual schedule beats a list any day. Gantt charts make it easy to map each task against your project timeline, ensuring nothing gets overlooked.
How to Create a Gantt Chart for PPM:
- List Tasks: Start with the task-specific checklists you created in Step 2.
- Assign Durations: Estimate how long each task will take. For example, an oil change might take 2 hours, while a full HVAC inspection might need 6 hours.
- Set Dependencies: Identify tasks that require equipment downtime or other prerequisites, and plan accordingly.
- Add Buffer Time: Account for delays, especially for high-impact equipment.
Tools to Use:
- Excel: Great for small projects with limited tasks.
- MS Project or Primavera: Best for larger, more complex schedules.
- EstimateNext: Automatically integrates PPM tasks into your overall project schedule with its trade-wise Gantt feature.
Why It Works:
Visualizing tasks in a timeline format helps identify overlaps, resource conflicts, and potential delays. It also makes it easier to communicate the schedule to your team.
Step 5: Automate Reminders
Nobody remembers a quarterly task without reminders—especially in the chaos of a construction site. Use digital tools to set automated alerts and notifications to keep everyone on track.
How to Set Up Automated Reminders:
- Email Notifications: Create alerts like “Excavator hydraulic hose inspection due tomorrow.”
- Mobile App Alerts: Push notifications to your team’s smartphones for on-the-go updates.
- Central Dashboard: Use a dashboard to track overdue tasks and upcoming deadlines in real time.
Recommended Tools:
- EstimateNext: Offers collaboration features with automated alerts and task tracking.
- Trello or Asana: Simple project management tools suitable for smaller teams.
Common Pitfalls to Avoid
- Overloading the Schedule: Don’t add low-priority tasks just to fill the calendar. Focus on what truly matters.
- Skipping Documentation: Always log completed tasks. This provides accountability and a paper trail in case of failures.
- Ignoring Manufacturer Guidelines: Follow recommended intervals religiously—don’t extend them to save time or money.
- Not Training Your Team: Even the best schedule fails if your team doesn’t know how to execute it.
- Overlooking Seasonal Adjustments: Some tasks, like HVAC maintenance, need more attention during specific seasons.
FAQ
Q: How often should I review my PPM schedule?
A: At least quarterly. Equipment usage, site conditions, and manufacturer updates can all necessitate schedule adjustments.
Q: What’s the best format for a PPM schedule?
A: Excel works for small projects, but larger sites benefit from specialized tools like EstimateNext or MS Project.
Q: How do I calculate spare part lead times?
A: Check vendor quotes or use procurement tools that factor in real-time supplier lead times and availability.
Q: Can I combine PPM with reactive maintenance?
A: Yes, but aim for a balance. A 70:30 split between preventive and reactive maintenance is a good starting point.
Q: What’s the ROI of a good PPM schedule?
A: While it’s hard to quantify exactly, a well-executed PPM schedule reduces equipment downtime, extends asset life, and prevents costly emergency repairs.
Final Thoughts
Creating a solid PPM schedule isn’t rocket science, but it does require discipline and the right tools. Start simple, focus on high-impact tasks, and align everything with your project timeline. If you’re struggling with procurement timelines or integrating schedules, tools like EstimateNext can make a real difference.